

Set up SAML authentication with Okta#
This article explains how to set up SAML with Okta for an organization in Aiven. For more information on SAML and instructions for other identity providers, see the Set up SAML authentication article.
Prerequisite steps in Aiven Console#
In the organization, click Admin.
Select Authentication.
Click Add authentication method.
Enter a name and select SAML. You can also select the teams that users will be added to when they sign up or log in through this authentication method.
You are shown two parameters needed to set up the SAML authentication in Okta:
Metadata URL
ACS URL
Configure SAML on Okta#
This is a two step process. First, you create the SAML SP-Initiated authentication flow and then you create a bookmark app that will redirect to the Aiven Console’s login page.
Log in to the Okta administrator console.
Go to the Applications tab.
Click Create a new app integration.
Select SAML 2.0 for the Sign on method, then click Next.
Enter a name for the app and add a logo.
Set it’s visibility for your Okta users and click Next.
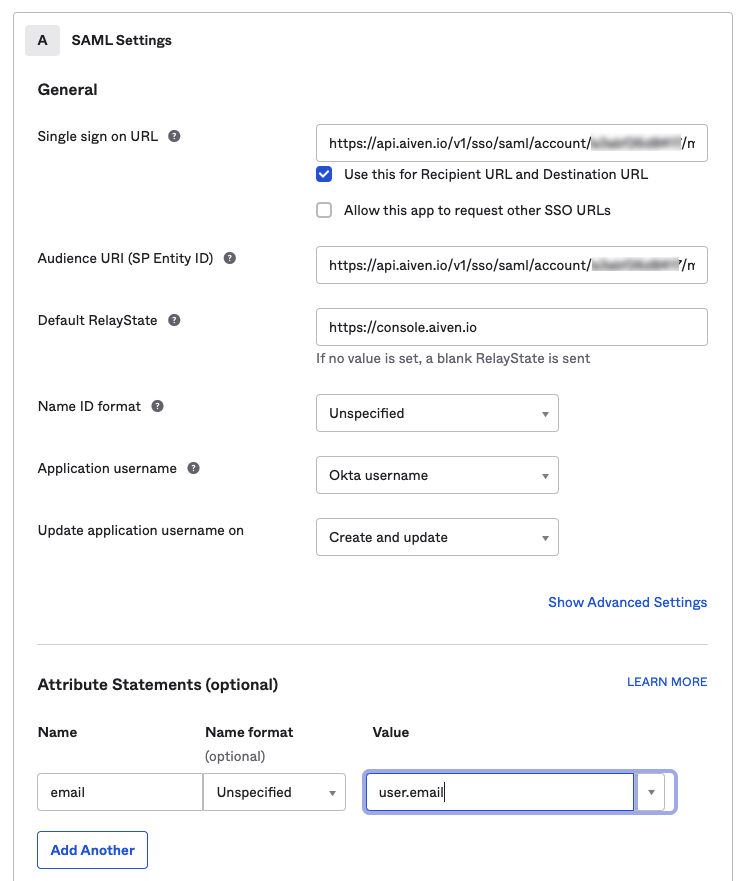
Set the following values in the app configuration:
Parameter
Value
Single sign on URLACS URLAudience URI (SP Entity ID)Metadata URLDefault RelayStatehttps://console.aiven.io/when using the Aiven Consolehttps://console.gcp.aiven.io/when using Aiven GCP Marketplace Consolehttps://console.aws.aiven.io/when using Aiven AWS Marketplace ConsoleImportant
The
Default RelayStateis the homepage of the Aiven Console and is fundamental for IdP initiated sign on to function correctly.Add an entry to Attribute statements with:
Parameter
Value
nameemailvalueuser.emailClick Next and then click Finish. You are redirected to your application in Okta.
Click the View Setup Instructions for the application.
Go to the Sign On tab and copy the application data to be used in the final configuration in Aiven:
Identity Provider Signle Sign-On URLIdentity Provider IssuerX.509 Certificate
Go to the Assignments tab.
Click Assign to assign users or groups to the Okta application.
Note
New users need to be assigned to the Aiven application in Okta for the login to be successful.
Finish the configuration in Aiven#
Go back to the Authentication page in the Aiven Console to enable the SAML authentication method:
Select the name of the Okta method that you created.
In the SAML configuration section, click Edit.
Add the configuration settings from Okta:
Parameter |
Value |
|---|---|
|
|
|
|
|
|

Toggle on
IdP loginandEnable authentication method.
£. Click Edit Method to save the settings.
You can use the Signup URL to invite new users, or the Account link URL for those that already have an Aiven user account.
Troubleshooting#
Authentication failed#
When launching Aiven SAML application getting the following error:
Authentication Failed

Login failed.  Please contact your account administrator for more details.
Check Okta authentication in Aiven console if IdP login and Enable authentication method are enabled.
Invalid RelayState#
If you get the Invalid RelayState, then you are attempting an IdP-initiated auth flow, for example by clicking the Aiven SAML app from the Okta UI. Previously, Aiven did not support IdP-initiated flows, but now it is possible if you set the Default RelayState in Okta to the corresponding console of your account as defined in the Configure SAML on Okta section.
The Okta password does not work#
Make sure to use the Account Link URL to add the Okta Authentication method to your Aiven profile.
Once linked, you should get the choice of multiple sign-in methods as well as see the other Authentication method in User Information -> Authentication section on the Aiven Console.